Friday, March 15, 2013

Irish Car Bomb Cupcakes

Hey y'all!

It's Friday! Ya know what that means? St. Patrick's Day is quickly approaching, along with various Irish festivals and events!

I know I just gave you an awesome recipe for Corned Beef and Cabbage with Horseradish, but you should just go ahead and plan to make these bad boys too -- Irish Car Bomb Cupcakes.

Ever had an Irish Car Bomb? I have -- I've had some good experiences and some not-so-good experiences with them. That's just the way the cookie cupcake crumbles sometimes haha. For those that don't know what an Irish Car Bomb is, it's essentially a half pint of Guinness with a shot of equal parts of Jameson Whiskey and Bailey's Irish Cream dropped down into the Guinness. Doesn't sound too intimidating? Well try this on for size -- as soon as you drop the shot into the Guinness, you gotta have your chugging pants on or else it will curdle due to a reaction between the Guinness and the Bailey's . . . then it's not going to go down as easily as it would have. If you want a little more information about Irish Car Bombs, check here, here, and here.

Now that you know what an Irish Car Bomb is, let's make them into cupcakes! I've definitely noticed a shift in cooking patterns lately, and it involves incorporating beers and liquors into cooking -- whether it be baking with liquors, marinating and braising with craft beers, or grilling with booze-infused sauces.

Guess what? I dig it. A lot.

The best part about these cupcakes? You don't have to worry about curdling or chugging. Win, win I'd say.

There are a few couple million pins on Pinterest for Irish Car Bomb Cupcakes but mine are different than most. Almost every variation I've seen uses Bailey's in the buttercream icing and Jameson in the inner ganache. How come? I guess it was a trickle down effect used by everyone that recreated these.

So what do I do that's different? The opposite. To me, the Bailey's just goes phenomenally with the ganache and the Jameson with the buttercream. That's how I've always made 'em. They're the bomb dot com and people will act like it's the best thing they've ever eaten. Seriously. Maybe we should form a support group . . . BCA -- Boozy Cupcakers Anonymous. Yes - cupcakers is now a word.

Either way, make these gems and take 'em to your St. Patty's Day festivities. They will certainly be a hit, especially amongst the DDs. Bee tee dubs (btw) -- this recipe makes 24 treats and they pair realllllly well with your morning coffee. Too well in fact. They're pretty alright with a glass of milk too :)


Irish Car Bomb Cupcakes


Cupcakes 

What You'll Need

  • 1 C Guinness - some stores carry single pints for purchase, but what's the fun in that?
  • 3/4 C unsweetened cocoa powder
  • 1 C unsalted butter
  • 2 large eggs
  • 2 C sugar
  • 2/3 C sour cream
  • 3/4 tsp salt
  • 1 & 1/2 tsp baking soda
  • 2 C all-purpose flour


How To Make Them

  • Add Guinness and butter to a small sauce pan and bring to a simmer. I make sure my butter is at room temperature before adding it to the Guinness because I don't want too much of the Stout to burn off -- I don't know about y'all, but I like the flavor. 
  • Once the mixture has melted, remove from heat and add the cocoa powder to the mixture and whisk together to incorporate. Set aside.
  • Using a stand mixer, add your eggs, sugar, and sour cream and blend until incorporated. 
  • Next, add the baking soda and salt and mix until incorporated.
  • Now you may add the chocolate/beer mixture to the stand mixer -- blend until combined. 
  • Lastly, slowly add the flour to the mixture until incorporated and then mix for an additional minute or two.
  • Preheat your oven to 350F.
  • Pour your batter into cupcake liners about 3/4 full -- place in oven and allow to bake for 18 to 20 minutes or until toothpick/knife comes out clean.
  • Remove cupcakes from oven and allow them cool on a cooling rack.
  • Once the cupcakes have cooled, you will need to make a hole in the center of each cupcake. You can choose to remove the entire center or remove about mid-way down into the cupcake. This can be achieved with a sharp knife, or with the ease of a tool such as this or one like mine (corers come in various shapes and sizes).


Ganache


What You'll Need

  • 8 to 9 ounces bittersweet chocolate (I buy the semi-sweet baking squares)
  • 2 tbsp butter at room temperature
  • 2/3 C heavy whipping cream
  • 1 tsp vanilla
  • 3 tsp Bailey's Irish Cream (I'm heavy handed so I add to taste, which is usually always more than this)


How To Make It

  • Break apart your baking squares/chocolate in a medium-sized glass bowl. 
  • Add your heavy whipping cream to a small sauce pan over medium heat -- heat until bubbling. 
  • Remove from heat and add the vanilla and Bailey's to the hot whipping cream.
  • Pour this hot mixture over the chocolate and allow to sit for about 30 seconds. 
  • Begin to incorporate the two with a whisk. Initially it may look very "runny"-- just continue to stir/beat with whisk until it begins to incorporate and thicken.
  • Add butter and incorporate.
  • Taste and see if it needs more Bailey's :) If so, add while the mixture is still warm and somewhat "thin."
  • Fill each empty cupcake hole with the ganache.


Buttercream Frosting


What You'll Need

  • 1/2 stick salted butter at room temperature
  • 1 block of cream cheese (best if it's at room temperature too)
  • 6 C powdered sugar
  • 2 tsp vanilla
  • 4 tsp Jameson Whiskey (Again, I'm heavy handed so I add to taste, which is usually always more than this)


How To Make It

  • Using a bowl and hand mixer, add your butter and cream cheese to the bowl and incorporate with mixer until the two are fluffy.
  • Add the vanilla and Jameson Whiskey and combine. 
  • Now begins the tedious process. Add your powdered sugar to the creamy mixture one cup at a time making sure each cup is incorporated before adding the next. 
  • Do this until all the powdered sugar is incorporated.
  • I find that frostings like this one can sometimes be too sweet, so sometimes I add a little bit more butter or cream cheese to offset the sweetness if I find that I have made it too sweet. Adding more Jameson is another option too :)
  • Once the ganache has been added to each cupcake, add your frosting to a piping bag and decorate!
  • I chose to add a few green sprinkles and gold coins for a little added St. Patty's Day effect (I found my gold liners and coins at Michaels). 


Go crazy with decorating! These really can be quite fun! O and have a pint for me will ya' -- St. Patty's Day is a blast!

-Sue

Monday, March 11, 2013

Irish Corned Beef and Cabbage with Horseradish Sauce - St. Patty's Day Delight

Guess what? 

I'm on Spring Break! 

The last one I'll ever have - boooo!

The bright side? Next year I'll be on clinical rotations and then the year after that -- wait for it -- I'll be a pharmacist! Time is sorta flying if I think about it, but when I'm up all night studying I'm all, "Oh em gee this process is never ending!"

Anyways - who's gearing up for St. Patrick's Day? I hope you're all saying, "Me! ME! Me! I am, I am!" I kinda love St. Patty's Day. I mean -- what other day can you dress up in green, talk in an accent, eat delicious food, consume wonderful libations, and do it all with your closest friends? There IS no other day! Seize it people, you'll be sorry if you don't. 

For Richmonders, Shamrock the Block is probably one of (if not) the first outdoor festival of the year -- we love our outdoor festivals in Richmond. Each year, my friends do a huge Irish brunch complete with Guinness, Irish Car Bombs, green mimosas and beer. It's an awesome time to say the least. Around noon, we walk on down to the festival (perks of friends living in Church Hill) and scope out our spot -- last year it was at good 'ol Rosie's. By the end of the day, we're all grateful that we stuffed our faces that morning.

In previous years, one of our friends always made the corned beef and cabbage. What's the problem this year? She moved! Such a bummer any way you look at it, especially since she's the most fun out of all of us AND her corned beef was the most delicious ever. 

My solution? I'll make it. 

What? 

Yea. That's right. 

I couldn't just show up this weekend with a corned beef that I had never tried, so last weekend I studied about a million recipes and pins to test things out. Here's my product. It's delicious. It's easy. You can't go wrong. If you do, call me up and have some beer waiting for me -- I'll help ya out. 

O and one more thing -- what's corned beef and cabbage without some horseradish sauce? NOTHING. You have to make this. I'd keep it in my fridge year round if I could. 

I can. 

But I shouldn't. 


Irish Corned Beef and Cabbage 


What You'll Need

  • ~3 lb corned beef brisket - in brine 
    • Yes, this matters. Let's talk brisket for a second. There's beef brisket and corned beef brisket. The difference? Beef brisket is plain and unseasoned. It's just beef. Corned beef brisket has sat in a brine, flavorings and spices have been added, etc. You can certainly purchase a beef brisket and brine it/season it yourself and then cook accordingly to achieve this dish, buuuuut that would take me forever and ain't nobody got time for that. Just google around or look on Pinterest, there are various beef brisket brine recipes (say that three times fast) out there.
  • 14 to 16 C cold water
  • 2 or 3 whole cloves
  • 2 bay leaves
  • 4 whole allspice berries
  • 2 tsp whole peppercorns
  • 1 small head of cabbage or ~1/2 large head of cabbage - cut into thick wedges
  • 1 and 1/2 lbs. small, new potatoes (~11 potatoes) - halved 
    • My grocer didn't have new potatoes, so I opted for baby yukon golds instead - new potatoes will have a better flavor/thinner skin.
  • 1 small bag of baby carrots 
  • Ground pepper to taste
  • Guinness to accompany your meal -- it's a must.


How To Make It

  • Preheat your oven to 300F.
  • Using a colander in your sink, remove the corned beef from the package and rinse with cold water. There will be a flavor packet of seasonings somewhere inside -- just toss it out.
  • Once your meat is rinsed, add your corned beef to a dutch oven with a tight lid or a stock pot with a tight lid. The dutch oven I had on hand was only 6 quarts -- you really need something 8 to 10 quarts to ensure your meat has enough room with liquid inside. 
  • Next, add ~16 cups of cold water to your meat and pot. 
  • On the stovetop, bring your pot to a boil. As it begins to boil, skim off the crud that begins to surface. 
  • Now you can add all of your spices -- cloves, bay leaves, allspice berries, and peppercorns. Just an fyi -- if you deviate to much from this spice list, such as adding a lot more or less of any one thing, it will dramatically change the flavor profile of the dish. That's not a bag thing, just a heads up. "Whole" spices are very potent and flavorful which is why you don't need a lot. Adding them once you've skimmed the crud off will ensure that you don't remove any that accidentally float to the top.
  • Once your spices have been added, allow to bubble for a minute or two. 
  • Next, add your pot with a tight fitting lid to a 300F oven and cook for 3 hours and 40 minutes. 
  • When the meat is done, remove the meat from the pot and allow to rest on a serving dish/cutting board while your veggies cook. Make sure you cover it tightly in foil. 
  • Place your pot with cooking liquid back on the stove top and bring to a rapid simmer/slow boil. 
  • Add in your carrots, then potatoes, then cabbage leaving one to two minutes between each. Cabbage takes the least amount of time to cook and you don't want it to become mushy. After cooking for about ~10 to 15 minutes, remove veggies from liquid and reserve some liquid for serving.
  • All done - enjoy!


Creamy Horseradish Sauce


What You'll Need
  • 1/4 C + 1/8C sour cream
  • 1/4 C + 1/8C mayonnaise 
  • 1/8 C + 2 tbsp. jarred grated horseradish with liquid (often found near the eggs/dairy at your grocer)
  • 1/2 tsp. grated lemon zest
  • Lots of fresh ground black pepper


How To Make It
  • Throw it all in a bowl and you're done! This sauce recipe can easily be doubled or more for larger crowds. One thing is for certain -- it's necessary. I like lots of horseradish and lots of lemon, so the more the better in my opinion. 


How many can you serve with this recipe? I'd say six healthy servings or eight proportional servings result. Variations for the entree? Some people use red potatoes, some don't use carrots or potatoes at all, some use a combination of these spices in addition to others, or leave a few out, and some even use Guinness. Horsey sauces vary too with the addition of mustard and various vinegars. As you can see, the possibilities are endless! 

Serving options? You could serve this with soda bread on the side and some fresh ground mustard if horsey sauce really isn't your thing. I'm not Irish and I've never had someone show me how to brine brisket or how an actual Irishman might cook their beef, but I do know one thing -- what I made is tender and melts in your mouth and that's good enough for me.

Seriously, what's easier than this? 

This dish isn't reserved just for St. Patty's Day - try it out at home for your family or perhaps for you and the loved one!

-Sue 

Friday, March 1, 2013

Pan Seared Scallops and Squid Ink Pasta with Peanut Sauce and Spicy Sesame Oil

TGIF!

Whose got plans this weekend? I'm gonna finish painting/distressing a trunk that I bought a month or so ago and organize some things - my life is the most disorganized it's ever been! Which isn't good and it's really strange for me because I have to have organization. I suppose living between two different zip codes will do that from time to time.

Switching gears - who watched the Top Chef finale this week? I'm guilty of having watched every season of Top Chef. I love it, what can I say!? I didn't get to watch the finale when it aired but I recorded it on my DVR and plopped down with a plate of food last night to watch it. I literally laughed out loud and said, "You've got to be kidding me" when Brooke and Kristin began to make their second dishes. Scallops. They had to use scallops in some form (pics of their dishes here). What was I eating at that very moment? Scallops. I'm sure you can see the irony. So I guess if I had been on Top Chef in Seattle, this is how I would have made my scallop dish (recipe at the bottom).

If you're not sure what you have planned for the weekend, how about trying your hand at this awesome dish? This could be served multiple ways - as a one bowl meal for you and your special someone, plated like I did as a centerpiece/appetizer/fancy meal-for-one, or as an amuse-bouche in a chinese serving spoon kinda like the ones here. No matter how you serve it, your peeps are gonna love it!

Also, let's talk scallops for a second. You need fresh ones. You're probably thinking, "Duh!" Sometimes it just has to be said though. I buy mine from seafood markets or Whole Foods depending upon the availability in my area (which is always, since I live so close to the ocean). By fresh, I mean never frozen and never injected. And by injected, I mean never filled with water or other foreign crud. You can ask before you purchase them and more than likely (depending upon where you're at), they will break things down for you about their product. Don't be afraid to ask! You're the paying customer, and no one wants to pay dolla-dolla bills for scallops, get home, and their dish not turn out. 

Now to address the elephant in the room - squid ink pasta. You're probably thinking, "This girl is cray!" Well that's probably true, but let's be honest here - regular pasta just doesn't give you the color contrast or wow-factor that this pasta will. By all means, feel free to use a spinach or whole wheat pasta - it will achieve the same flavors, but c'mon - black pasta is pretty darn cool. 

What is squid ink pasta? Squid ink pasta is just that - it's pasta that's colored with squid ink. It has the same flavor/texture as other pastas, it's just a little more unique! Where can you get it? Good 'ol Whole Foods. Not every Whole Foods has a pasta case, but many do. Not many will carry this type of pasta either, but if you're near the ocean it's a good possibility they will.

Pan Seared Scallops and Squid Ink Pasta with Peanut Sauce and Spicy Sesame Oil


What You'll Need
  • Scallops - quantity will depend on who/what you're cooking for (I can eat 3 to 4 decent-size scallops and be a happy girl).
  • Squid Ink Pasta - I used one sheet (linguine cut) and it produced seven amuse-bouche servings. You could probably get eight servings from one sheet if you're using serving spoons because they will need a little less pasta.
  • Smoked Salt - not essential, but definitely adds to the flavor profile of this dish.
  • Pepper
  • White Sesame Seeds and Red Pepper Flakes
  • Olive Oil - for searing the scallops - about 3 tbsp.
  • 1/2 C Sesame Oil - I used toasted sesame oil because I wanted that deeper flavor, but you could easily sub non-toasted sesame oil if that's what you have on hand.
  • 5-6 tbsp. Honey
  • 3 tbsp. Soy Sauce
  • 1-2 cloves Garlic, minced
  • 1/4 to 1/2 tsp. Red Pepper Flakes 
  • 1/2 tsp. Cayenne Pepper 
  • 3 tsp. Peanut Butter (I used a good quality, crunchy peanut butter for added texture) 
  • 1 tsp. Warm Water 
  • 1 tsp. Vinegar 
  • 1 tsp. Soy Sauce 
  • 1/2 tsp. Honey

How To Make It (this looks intense, but I promise it's not)
  • Pull your scallops from the fridge and inspect to see if they need to be pat-dried or not - if they look a little wet, just pat them dry with a paper towel (be gentle). If not, let's season them. Sprinkle smoked salt, pepper, and cayenne pepper on both sides of the scallops.
  • Get a small pot of water on your stove with about 1/4 tsp smoked salt added to it. Don't boil it just yet.
  • Now let's make our sauces. 
    • Spoon out your peanut butter into a small bowl. Heat on stove top/microwave just so that it's broken down and more liquid-like. 
    • Next, add your water, vinegar, soy sauce, and honey - mix to incorporate. 
    • You're done with sauce #1 - just set aside. You may need to re-warm just before serving. 
  • Go ahead and bring your pasta water to a boil and begin to make your second sauce. 
    • For sauce #2, place sesame oil in another small sauce pan. Heat over low-medium heat for a few minutes. Watch your oil because you don't want to burn it. 
    • Next, add the honey, soy sauce, minced garlic, red pepper flakes, and cayenne pepper to the oil. 
    • Continue to heat for a few minutes, stirring occasionally. 
    • You're done with sauce #2 - just set aside. 
  • Now your water is probably boiling. Place your pasta in the boiling water for ~3-5 minutes. (Fresh pasta takes far less time to cook than boxed pasta does.) 
    • Once your pasta is finished, do not strain it in a strainer! 
    • Remove the pasta from the heat. 
    • Have a bowl ready with a tad bit of your spicy oil in the bottom. 
    • Using a fork, pull a small bunch of noodles from the hot water and add to the spicy oil bowl. Continue to do this until all the noodles are in the spicy oil bowl. You can add a little bit of oil each time and mix to incorporate noodles and oil. Set aside. 
  • Now for the scallops. 
    • Add a little bit of olive oil to a non-stick skillet pan over medium-high heat. Bring the oil to temperature and then add your scallops to the pan, but don't crowd them. Cook on one side for ~2 minutes, flip them, then cook for another 1 & 1/2 minutes. You want a nice sear on each side but you don't want to overcook them. Scallops can get very rubbery very quickly! 
  • Now you have all of your components ready. 
  • Plate how you like! 
    • If you liked my plating, just grab a spoon and fork for your pasta. Grab a couple noodles with your fork and twist them into the spoon making a round "bunch" (like this guy is doing). Just place each "bunch" on your plate. Garnish pasta with sesame seeds. Then add one scallop to each "bunch," drizzle a tad bit of spicy oil over each scallop, and garnish with red pepper flakes. 
  • Now you're ready to enjoy!

It may seem like there's quite a bit of cayenne pepper and red pepper flakes in this dish - because there is. But that's ok! I like my food really spicy so you can definitely cut down on the spice to match your taste preferences. The peanut sauce recipe listed above makes about 4 tbsp. worth of sauce which may not seem like much, but it would be very easy to double/triple ingredients to make a larger quantity. As for the oil, you will definitely have some left over because you just want it to coat your noodles - you don't want them saturated. Try saving the leftover oil and using it as dressing for chicken or salads for later in the week. 


Hope you enjoy!

-Sue

Tuesday, February 26, 2013

Bouchon Bakery Macarons

Remember when we had coffee and I told you not to make macarons? Yea, I still stand by that -- that doesn't mean they don't photograph well though. 

Macarons are by far probably one of the most difficult pastries to master. Seriously. When folks go through culinary school, specifically the baking portion (if they choose to do so), macarons can make or break ya. What do I mean? They could make you hate your life. 


With that being said, why did I wake up one day wanting to make them? Because I saw it as a challenge. And because they are delicious. And pretty.


Nevermind that I haven't had a minute of professional culinary guidance. 

Nevermind that they are one of the most difficult pastry items to master. 

And nevermind that they're so delicate, handling them could make a grown man cry. 


I did my research. Kinda. I watched lots of videos. Scoured many hundreds of recipes, blogs, and pins. What did I decide on? Thomas Keller's macaron recipe. I figured if his 2 inch goodies (get your mind out of the gutter - I know what you're thinking) could draw people from all over and make him boo-koos of dollars -- he must be doing something right. That and the fact that he has a list of accolades the length of The Great Wall of China. He's not just a baker either.

Cue The Bouchon Bakery Cookbook. This book is the real deal. Even if you don't buy it to make macarons, the other recipes will surely lure you in.

I figure if I share the ingredients, you could at least decide if it's something you want to actually do and can go from there. Just go ahead and buy a dozen eggs. You'll need lots and lots and lots of eggs. And a stand mixer. I'm not saying this can't be done without a standout mixer. I am saying that your life would be hell on earth without it. Just keeping it real. And if you want a valuable tip - make your buttercream at night and make your macarons the next day. You'll be less stressed and will probably enjoy everything more if you do it that way :)


This is one of, if not my favorite picture that I've ever taken. And it's of eggs. Such a weirdo I am. #yodatalk


Thomas Keller's Basic Buttercream 


What You'll Need

  • Egg Whites - 1/4 C + 1 tbsp.
  • Granulated Sugar - 3/4 C and 2 tbsp. + 2 & 1/4 tsp. and 3tbsp. + 1tsp.
  • Water - 3 tbsp. + 1 tsp.
  • Unsalted Butter - 8 ounces, cut into 1/2 inch pieces, at room temperature
    • The book offers various methods for flavoring. I chose to add just a few drops of oils and Wilton coloring to my buttercream to make a couple different flavors/colors. The pink is a strawberry (artificial strawberry will never be my favorite, but I was under a time crunch), the purple was just plain vanilla, the cream colored one was coconut, and the brown one was chocolate-hazelnut with a little cocoa powder for color.


Thomas Keller's Vanilla Macarons


What You'll Need

  • Almond Flour/Meal - 1 & 3/4 C + 2 & 1/2 tbsp. 
  • Powdered Sugar - 1 & 3/4 C + 1 tbsp. + 2 tsp.
  • Egg Whites - 1/4 C + 1 & 1/2 tbsp. and 1/4 C + 2 tbsp.
  • 1 Vanilla Bean, split lengthwise
  • Granulated Sugar - 1 C + 3 tbsp. + a pinch for the egg whites
  • Water - 2/3 C


I chose to share the ingredients and not the actual how-to for several reasons:

  • It would take me forever to type it all up.
  • I'm not sure what copyright cat is sitting behind their computer waiting for me to over-share.
  • The cookbook is worth every cent. You could use it as a conversation piece/coffee-table book if anything.

If you get the book and do decide to make them, let me know how they turn out! I went into this with every expectation of failing every step of the way. A little more than half of my macarons didn't turn out, but I still had some totally edible product. No one complained that they were horrible either!


Usually I would attempt to figure out what went wrong and maybe try it again. That will not be happening with these. I repeat, I will not be attempting these again haha. If anything, I'll have them shipped in from Thomas Keller himself. At least I know I tried.

-Sue

Monday, February 25, 2013

Brunch at Heritage and the James River Park System/Belle Isle

It's Monday y'all - thank goodness it's over (serious case of the Mondays over here). 

Let's talk tv. Anyone out there watching The Following on Fox? It's a fairly new show based out of Richmond, VA and a few other surrounding cities (Petersburg, Norfolk, etc.). A brief synopsis? A romantic literary professor turned serial killer that drew his inspiration from Edgar Allen Poe. The link? Edgar Allen Poe lived in Richmond for a large portion of his life. Y'all know me by now - I eat.sleep.breath all things Richmond. It's muh city, what can I say? O and you're in luck! It's coming on tonight. I definitely recommend getting caught up on episodes you've missed. Besides, who doesn't love some Kevin Bacon (he plays the detective)?

Since I love all things Richmond, it's only fitting to share a little piece of Richmond with ya. How about the James River Park System? Never heard of it? My mom hadn't either until we were skipping across the bridge to Belle Isle. Like myself, my mom was born and raised in Richmond -- so how could she have never heard of the James River Park System? Because when she was my age there was no "park system." It was just rocks and the swiftly flowing James River -- you had to hope the river was low enough so that you could skip rocks across. Yep, that was one of many stories we bonded over a couple of weekends ago. Of course the ones about her skipping school with friends on those same rocks were also included - HA! #sorrymom #youvebeenouted

So yea - about a month ago on a Sunday morning, my mom and I straight grubbed at Heritage. There was nothing lady-like about what we ordered or how we ate it. My mom got the Chicken and Waffles and I got their Biscuits and Gravy. If you're a local go. Now. If you're not, ya need to come visit and grab brunch here. ASAP. Trust me - I'd never lead you astray.

Best post-brunch idea? Go walking along the river. It was a crisp, cool January day and while things were definitely grey and bare, it was still muh city and I loved it.

The river was super high that day.

Sun flare and just a little snow that hadn't yet melted.

These trees. I love them.

How my mom used to get across . . .


Here's where our road ended and we had to find alternative means.

When I was in high school, we used to come down here and lay out on the rocks. Talk about a good time.


How we got across - the bridge that was unheard of when my mom was younger.


Look at that flare would ya?


O Christmas tree, O Christmas tree -- someone must have gotten seriously angry with this tree.


Check out the park system. You can walk, bike, run and it's tons of fun.

-Sue

Thursday, February 21, 2013

DIY Map-Inspired Resin Drink Coasters

Hey there!

Who's ready for a little craft? I promise it's fun and it will definitely wow your friends! I'm sure many of you have seen various tutorials surface on Pinterest on how to make drink coasters using bathroom tiles, your favorite photographs, and resin. How's this tute different? I've used it all - photos, paper, etc. I know what works and doesn't and the best method for each!


I actually made these for the first time about a year or more ago, and the thought of using resin scared me. I had the shakes and muscle twitches at just the mere thought of using it. 

Why? 

I.Have.No.Idea.

I'm usually the first to jump on board with new materials and tools, but this resin stuff was throwing me for a loop. I think it was because I had never used it before, you have to work quickly (I like to take my time with arts/crafts), I thought I might screw up my project and have to scrap it . .  the list goes on. 

Why on earth would I tell you this is fun and then tell you I had night sweats about the thought of using it? Because! I'm here to build you up! To add a new skill to your craft knowledge arsenal! To be your rah-rah resin cheerleader. For real though. You can do this. It's not bad. You'll be so proud of yourself when you're done. And what's the worst that could happen? Let's say you do mess up. You've only spent about 30 minutes of your time and just a couple bucks. More importantly, you'll have learned what not to do for next time.

Let's get started shall we? This is gonna be a little mix of Instagram/big-girl camera pictures. 

If you're using photos, you will not need Mod Podge. If you are using something paper-based like scrapbook paper, old love notes, or in my case, maps - you will need Mod Podge. What kind? O that's a good question. Out of all the craft goods that I own, Mod Podge is not one of them. Just never been a Mod Podge girl. Sue me. 

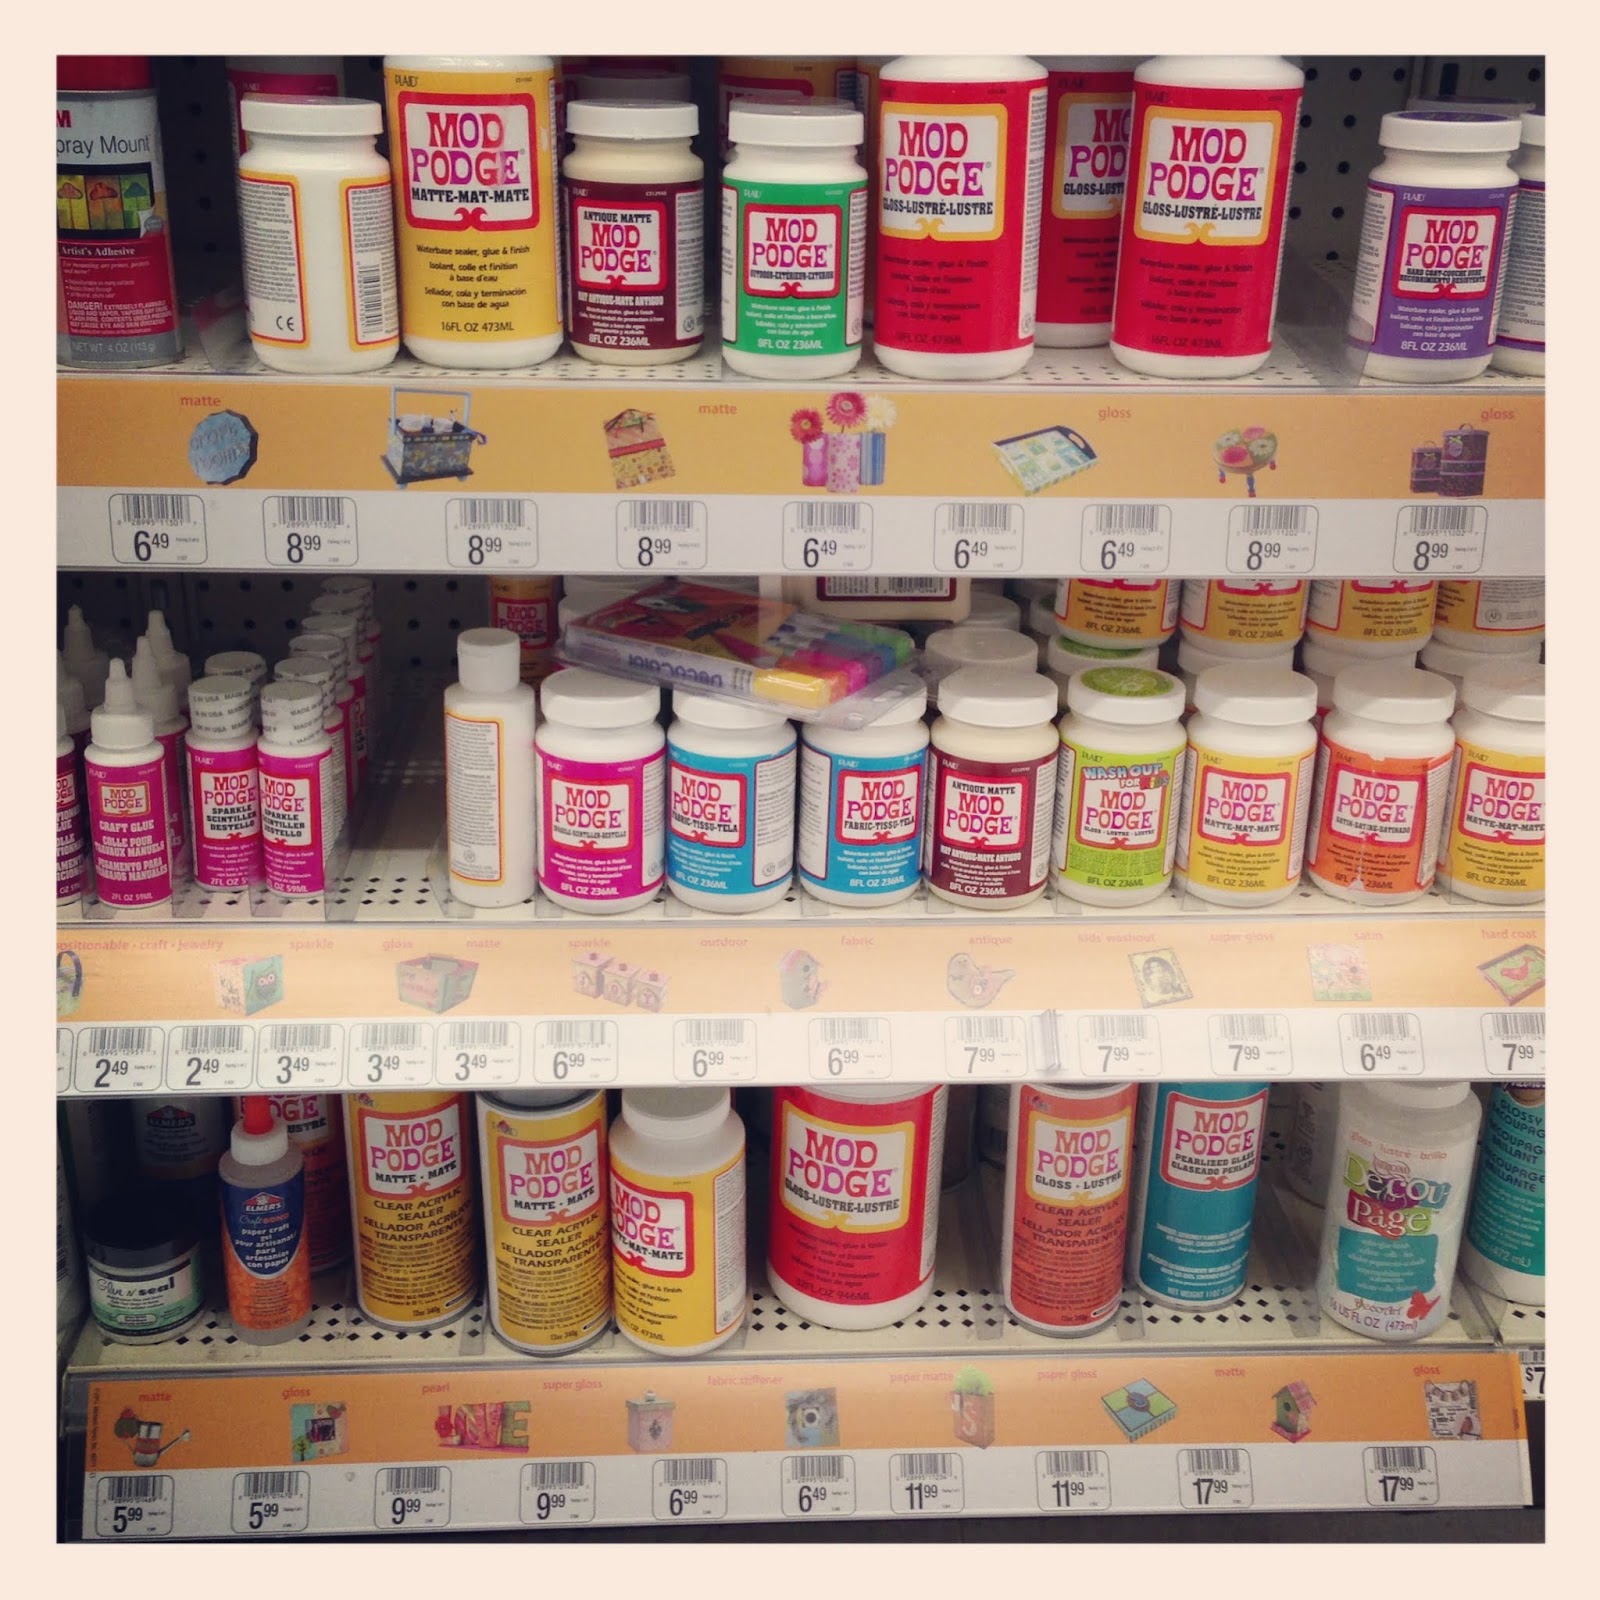
My roommate used to use Mod Podge like a feen. On every surface. Everywhere. Everyday. She said she loved it. I thought ok, let me head out to give this a try. I walked up in Michael's and found this:

Why? Why are there so many kinds? This is where I started sweating again. Just imagine my eyes growing larger and larger as I picked up every single bottle of Mod Podge asking whyyyyyyyy each and every time. My choice? I went with the yellow one that's a matte finish (truthfully, I don't think it matters because you won't see it or your brush strokes after you pour your resin on top - the resin just needs something to grip if you're using a paper-based product on your tile). So what else will you need? Follow the steps below!

DIY Map Inspired Resin Drink Coasters


What You'll Need
  • 4 - 4x4 square bathroom tiles (the color is up to you - white/tan looks best since the sides will be white no matter what)
  • Pictures, scrapbook paper, maps, etc.
  • Glue stick
  • Mod Podge
  • Foam Brush
  • Old credit/library card - (for smoothing things out)
  • Resin - (I used the Enviro Tex Lite Resin) - For all you Richmonders, Pleasant's Hardware sells the small box and the large containers of this for a fair price (try not to buy anything else while you're in there - I dare ya). I have since seen the small box at Michael's and you could use a 40% off coupon. I purchased the small box, have over half of it left, and I've done four sets of these to date.
  • Large popsicle sticks
  • Cork Contact Paper or Rubber/Cloth Feet for Frames
  • Blowtorch or straw
  • Hairdryer
  • Four items to elevate your tiles

How To Make Em (see images at the bottom)
  1. Gather all of your supplies.
  2. Cut your images (whichever you're using - scrapbook paper, pictures, maps) just smaller than the tile, leaving a small border around the edge of the tile. 
  3. Next, roll out your cork contact paper. Use the image squares you just cut as a template and cut four squares out of cork. These will be applied to the back of your coasters to help protect your tables.
  4. After you cut your cork, apply your images to top of your tiles using a glue-stick, making sure you cover the maps well before applying to tiles (especially the edges). Smooth out with a credit card or something of the like. If you are using pictures - glossy/matte finish, it doesn't matter - skip the next step involving Mod Podge. You only need Mod Podge if you're using something paper-based.
  5. Crack open your Mod Podge and apply a thin coat with your foam brush all over the tiles. Once you have one coat on, apply another generous coat. At this point, air bubbles may be forming under your images. Using the brush/your old credit card, gently smooth out the edges/bubbles. This may take a few tries, just be patient, diligent, and gentle - you don't want to rip your image. Allow to cure - I waited 24 hours because I wanted a nice, hard, moisture-free surface. If you see brush strokes, it's ok - you won't see them once the resin is poured and set.
  6. Line a small table with parchment paper.
  7. Use four items to elevate your tiles. (I used some larger, round honey mustard dressing packets.) Keep in mind that it should be something smaller than the tile, not too tall, and stable enough so that the tiles don't tip over when you're pouring your resin. You can pretty much bet that if resin gets on the your table/items used to elevate your tiles, these things will be ruined because it's never coming off. This is why parchment paper is your friend because you can just roll it up and trash it when you're done. 
  8. Next, mix up your resin according to the directions on your box. Tip - it's better to over mix than to under mix, so . . . Stir It Up Little Darling. You could even listen to that as motivation while you stir :) This should be done in a well-ventilated and temperature controlled area. 
  9. Once you've mixed your resin, you're ready to pour!
  10. Pour a small stream of resin in a ribbon-like manner over tile #1. Use your popsicle stick to smooth it all out. Pour more resin if needed and smooth out. Less is more and the resin expands, so start low and slow with how much you pour. Once you're comfortable with your first tile, proceed to the 2nd, 3rd, and 4th tiles. 
  11. After the tops are completed, you may see some drippage on the sides and bottoms. Using a new popsicle stick, smooth the dripping resin over the sides for a nice finish and smooth out any drips along the bottom edge. 
  12. Within the first 15 minutes of pouring your resin, some tiny air bubbles will pop up on top of your tiles (usually around the edges of your images). Using a blow torch on the low setting, move across the tiles about 6-10 inches from the top of them - this will get rid of the air bubbles and set your resin. If you don't have a blow torch, using a straw to blow out the bubbles will also work. Having done both techniques, the blow torch is far easier. 
  13. Continue to watch your tiles for about 15 more minutes to make sure no more air bubbles appear. 
  14. Set your table aside, away from air vents/areas that are prone to dust, and allow the resin to sit for ~72 hours. Why so long? This will ensure a completely cured resin!
  15. Once cured, grab your cork squares, hairdryer, and cured tiles. Flip your tiles over and turn your hair dryer on the lowest warm setting. Apply heat to the back of the cork contact paper for ~1 minute. Turn your dryer off, peel of the backing slowly so that you don't split your cork, and apply to the back of your tile. Repeat for the other tiles.
  16. Wow your friends and enjoy!
Here's a couple pictures from the process!

Here are the tiles are after a couple coats of Mod Podge, edges smoothed out, and tiles drying. You can see some brush strokes but like I said, it won't matter.

You can see that awesome, glass-like finish in the next few photos.


Here they are all packaged up and ready to gift!


I hope you'll give resin a try - it really is a lot of fun!

-Sue